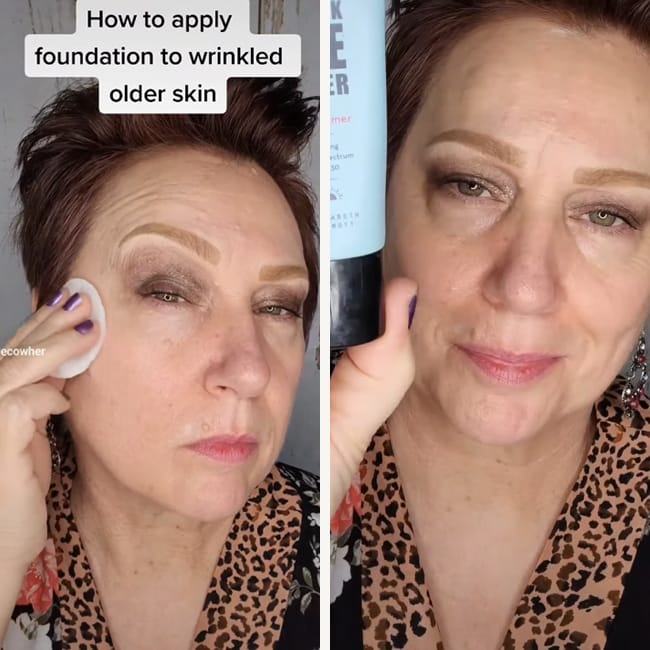

Anyone going through menopause knows the shift in hormones brings a cascade of changes to the skin—dryness, texture, enlarged pores, and makeup that suddenly stops behaving the way it used to. And according to over-50 beauty expert Melissa (known for her detailed, honest YouTube tutorials), one of the most common complaints she hears from her subscribers is this: “My foundation looks cakey, patchy, or breaks apart halfway through the day—and it’s worse since menopause.”
In her latest video, Melissa breaks down exactly why this happens and shares a step-by-step routine that completely transforms how foundation looks on mature, menopausal skin. The secret? Prep, precision, and using far less product than you think.
“This routine makes a huge difference,” she promises—and the before-and-after proves it.
Below, her full process explained.

Struggling With Sleep? This Rechargeable Sound Machine Is A Total Game-Changer
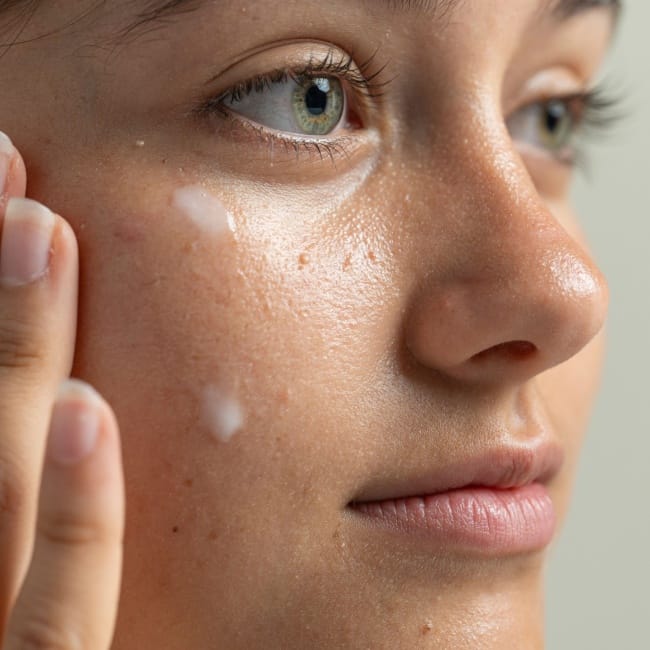
1. The Most Important Step: Prep Your Skin Like It’s Your Job
Menopausal skin is often dehydrated, thinner, and more prone to flaking, which causes foundation to cling, crack, and lift. Melissa says the fix starts long before you pick up a makeup brush.
“Prep, prep, prep. You need a ton of moisture—let your skin drink it in. That’s what makes your foundation look good all day.”
After applying hydrating skincare, Melissa recommends doing a quick check for excess oil.
- Option 1: Blot lightly with a single layer of tissue.
- Option 2: If skincare begins “balling up”—a major cause of texture—gently wipe your face with a microfiber towel to remove only the excess product.
You’ll keep the moisture, but lose the layers that cause foundation to separate.

2. Target Pores And Texture With A Tiny Amount of Primer
A huge mistake? Using too much primer—especially silicone-based ones.
Melissa uses Revlon Prime Plus Perfecting + Smoothing, but stresses that how you apply it matters more than which one you use. “Most people use way too much primer. Use a pea-size amount—and only where you need it.” Focus on:
- Sides of the nose
- Center of the cheeks
- Chin
- Center of the forehead
She presses (not swipes) the primer into the skin to smooth pores without creating a heavy layer.

3. Spot Conceal Before Foundation
This is the step Melissa says changes everything for menopausal skin.
Instead of relying on a thick layer of foundation to do all the work, she applies concealer only where needed—under the eyes, dark spots, and redness.
She uses Tower 28 Concealer, applying a single dot in the inner and outer corners of the eyes, then tapping it gently with a finger. After letting it sit and thicken slightly (“it becomes maximum coverage,” she says), she buffs it out with a brush for an airbrushed finish.

4. Use The Tiniest Amount of Foundation Possible
This is where most women over 50 go wrong.
“You only need the thinnest veil of foundation. Your concealer already did the work.” Melissa uses the Huda Beauty Glowish (Easy Blur) foundation, placing a pea-sized amount in her palm and dipping a brush spritzed with setting spray into it.
This distributes the foundation evenly through the bristles before it hits the skin—so it never looks heavy. She stipples (presses) the product from the center of the face outward. The result: Even coverage, visible skin, no mask-like effect.

5. Set Strategically—Not Everywhere
Powder can make menopausal skin look dry instantly. Melissa recommends using Kosas Cloud Set sparingly.
Her technique:
- Press powder into your palm first to remove excess.
- Gently tap powder onto only areas that get textured or oily (nose, inner cheeks, center forehead, chin).
- Never swipe—only tap or press.
For extra melting and smoothing, a damp sponge can also be used to press powder into the skin for an airbrushed finish.

6. Finish With A Hydrating Setting Spray (No Alcohol!)
Setting spray is the final step that brings all the layers together.
“Setting spray melts everything into the skin. Just make sure yours doesn’t contain alcohol—menopausal skin can’t handle that dryness.” Melissa recommends the Charlotte Tilbury Airbrush Setting Spray for its smoothing, blurring polymers.
After a generous mist, the makeup looks soft, lifted, and fresh—not cakey.
The Final Look: Skin, But Better
At 55, Melissa wants her makeup to enhance—not erase—her maturity. “It’s not going to look like 20-year-old skin, and that’s okay. Our wrinkles are earned. But your skin can still look incredibly beautiful.” Her method leaves the complexion:
- Smooth
- Fresh
- Even
- Hydrated
- And most importantly—not cakey or patchy, even after a full day.
This is foundation for real life, real skin, and real women.